How to Get Your Twitch Stream Key: Where to Find It
October 2, 2026 · StreamRove Team
Looking for how to get stream key Twitch or where to get Twitch stream key? You are looking for your channel’s broadcasting credential, not its public URL. This guide explains where to find it and how to choose the right connection for OBS or StreamRove.
Where to get your Twitch stream key
Sign in to Twitch Creator Dashboard, open Settings → Stream, and find Primary Stream Key. Use Copy rather than revealing the value on screen. Twitch documents key access and reset options in its Stream Key FAQ.
Before copying, check the profile picture and channel name. If you maintain a personal channel and a brand channel, an unnoticed account switch can send your broadcast to the wrong audience.
What the key does—and what it does not do
Think of an encoder connection as an address plus a credential: the server tells your software where to send video, while the key identifies the authorized channel. Your channel URL is for viewers; pasting it into a stream-key field does not configure an encoder.
Prepare the scene and make a local recording before testing the live connection. This separates production problems, such as the wrong microphone, from account or network problems. 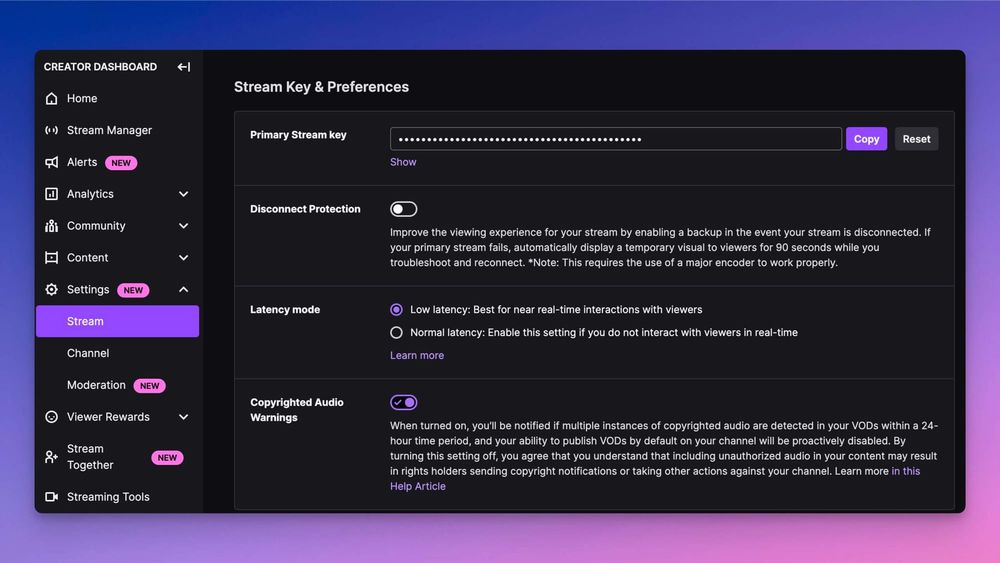
Use the key in OBS
- Open Settings → Stream in OBS.
- Choose Twitch as the service. If you prefer manual configuration, use the available stream-key option and paste your key.
- Save the settings. Check your scene, audio meters and intended channel before starting a broadcast.
- Open your public Twitch channel to verify the actual output. Mute the monitoring player to prevent feedback.
If your OBS setup offers Twitch account connection, you can authorize the account instead of handling a key manually. Avoid switching between connection methods in the middle of troubleshooting: identify which method your current profile uses first.
Using Twitch with StreamRove
In StreamRove, open Channels, select Twitch and complete the authorization flow. For an OBS broadcast relayed through StreamRove, use the StreamRove ingest address and StreamRove broadcast key in OBS. Select your connected Twitch channel as a destination.
Do not pair a Twitch key with a StreamRove server address. These credentials belong to different legs of the route: OBS sends to StreamRove, and StreamRove sends to Twitch. See the multistreaming overview for the overall workflow.
Missing key or connection error?
- You cannot find the setting: use the browser-based Creator Dashboard and verify the signed-in account, rather than searching the public channel page.
- The key does not appear: review the account’s security requirements, including two-factor authentication, and follow Twitch’s linked help instructions.
- OBS rejects the connection: check the selected service and re-copy the key without extra spaces. Confirm that a reset has not made a saved value outdated.
- OBS connects but the wrong channel is live: inspect the account or key used by that OBS profile and any selected cloud destination.
When should you reset the key?
If it appeared in a recording, screenshot, repository or shared message, treat it as exposed. Reset it from Twitch’s stream settings and update every manually configured encoder that used the old value. For linked services, check the connection and reconnect if required.
Do not reset repeatedly just because picture quality is poor. A working connection with blurry motion is a different problem from rejected credentials.
Frequently asked questions
Can a viewer obtain my key from my channel link? The public link is not the broadcasting credential. Keep screenshots of settings masked anyway.
Do I need to paste a key into StreamRove? The Twitch connection in Channels uses account authorization. The key OBS needs for a StreamRove relay comes from your StreamRove broadcast.
Should I share the key with someone helping me? Share screenshots with the entire value covered, error messages and the connection method instead. Those details are usually enough to begin diagnosis without exposing the credential.
Keep one final checklist: correct account, correct server, matching credential, local audio test and public-player verification. Once those agree, save your setup notes without the key itself.